Shiro Authorization Framework
首先知道Shiro架构有3个主要概念:Subject、SecurityManager和Realms。
ShiroBasic架构图 :
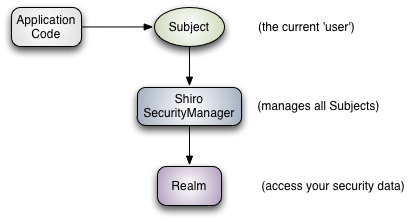 Basic架构说明:
Subject: As we’ve mentioned in our Tutorial, the Subject is essentially a security specific ‘view’ of the the currently executing user. Whereas the word ‘User’ often implies a human being, a Subject can be a person, but it could also represent a 3rd-party service, daemon account, cron job, or anything similar - basically anything that is currently interacting with the software.
Subject instances are all bound to (and require) a SecurityManager. When you interact with a Subject, those interactions translate to subject-specific interactions with the SecurityManager.
(大概意思:Subject一词是一个Safety术语,其基本意思是“当前的操作用户”。称之为“用户”并不准确,因为“用户”一词通常跟人相关。在Safety领域,术语“Subject”可以是人,也可以是第三方进程、后台帐户(Daemon Account)、定时作业(Corn Job)或其他类似事物。它仅仅意味着“当前跟软件交互的东西”。但考虑到大多数目的和用途,你可以把它认为是Shiro的“用户”概念。
在程序中你都能轻易的获得Subject,允许在任何需要的地方进行Safety操作。每个Subject对象都必须与一个SecurityManager进行绑定,你访问Subject对象其实都是在与SecurityManager里的特定Subject进行交互。)
Basic架构说明:
Subject: As we’ve mentioned in our Tutorial, the Subject is essentially a security specific ‘view’ of the the currently executing user. Whereas the word ‘User’ often implies a human being, a Subject can be a person, but it could also represent a 3rd-party service, daemon account, cron job, or anything similar - basically anything that is currently interacting with the software.
Subject instances are all bound to (and require) a SecurityManager. When you interact with a Subject, those interactions translate to subject-specific interactions with the SecurityManager.
(大概意思:Subject一词是一个Safety术语,其基本意思是“当前的操作用户”。称之为“用户”并不准确,因为“用户”一词通常跟人相关。在Safety领域,术语“Subject”可以是人,也可以是第三方进程、后台帐户(Daemon Account)、定时作业(Corn Job)或其他类似事物。它仅仅意味着“当前跟软件交互的东西”。但考虑到大多数目的和用途,你可以把它认为是Shiro的“用户”概念。
在程序中你都能轻易的获得Subject,允许在任何需要的地方进行Safety操作。每个Subject对象都必须与一个SecurityManager进行绑定,你访问Subject对象其实都是在与SecurityManager里的特定Subject进行交互。)
SecurityManager: The SecurityManager is the heart of Shiro’s architecture and acts as a sort of ’umbrella’ object that coordinates its internal security components that together form an object graph. However, once the SecurityManager and its internal object graph is configured for an application, it is usually left alone and application developers spend almost all of their time with the Subject API. We will talk about the SecurityManager in detail later on, but it is important to realize that when you interact with a Subject, it is really the SecurityManager behind the scenes that does all the heavy lifting for any Subject security operation. This is reflected in the basic flow diagram above. (大概意思:Subject的“幕后”推手是SecurityManager。Subject代表了当前用户的Safety操作,SecurityManager则管理所有用户的Safety操作。它是ShiroFramework的核心,充当“保护伞”,引用了多个内部嵌套Safety组件,它们形成了对象图。但是,一旦SecurityManager及其内部对象图Configuration好,它就会退居幕后,应用Development人员几乎把他们的所有时间都花在Subject API调用上。 那么,如何SettingsSecurityManager呢?嗯,这要看应用的环境。例如,Web应用通常会在Web.xml中指定一个Shiro Servlet Filter,这会CreateSecurityManagerExample,如果你Run的是一个独立应用,你需要用其他Configuration方式,但有很多Configuration选项。 一个应用几乎总是只有一个SecurityManagerExample。它实际是应用的Singleton(尽管不必是一个静态Singleton)。跟Shiro里的几乎所有组件一样,SecurityManager的缺省Implementation是POJO,而且可用POJO兼容的任何ConfigurationMechanism进行Configuration - 普通的JavaCode、Spring XML、YAML、.properties和.iniFile等。基本来讲,能够Example化类和调用JavaBean兼容Method的任何Configuration形式都可Usage。)
Realms: Realms act as the ‘bridge’ or ‘connector’ between Shiro and your application’s security data. When it comes time to actually interact with security-related data like user accounts to perform authentication (login) and authorization (access control), Shiro looks up many of these things from one or more Realms configured for an application. In this sense a Realm is essentially a security-specific DAO: it encapsulates connection details for data sources and makes the associated data available to Shiro as needed. When configuring Shiro, you must specify at least one Realm to use for authentication and/or authorization. The SecurityManager may be configured with multiple Realms, but at least one is required. (大概意思:Shiro的第三个也是最后一个概念是Realm。Realm充当了Shiro与应用SafetyData间的“桥梁”或者“连接器”。也就是说,当与像用户帐户这类Safety相关Data进行交互,Execute认证(登录)和授权(访问控制)时,Shiro会从应用Configuration的Realm中查找很多内容。 从这个意义上讲,Realm实质上是一个Safety相关的DAO:它封装了Data源的连接细节,并在需要时将相关Data提供给Shiro。当ConfigurationShiro时,你必须至少指定一个Realm,用于认证和(或)授权。Configuration多个Realm是可以的,但是至少需要一个。 Shiro内置了可以连接大量SafetyData源(又名Directory)的Realm,如LDAP、关系Database(JDBC)、类似INI的文本Configuration资源以及属性File 等。如果缺省的Realm不能满足需求,你还可以插入代表自定义Data源的自己的RealmImplementation。 象其他内部组件一样,由SecurityManager来管理如何UsageRealms来GetSafety的身份Data。)
看了上面一大段介绍后肯定还不知道怎么回事,来个简单比喻吧: 比如:新到一家公司,网管给你一台Development机,一个账号密码(这对应账号密码),你此时不知道账号是属于什么角色,是超级管理员,还是普通账号(这里就是对应角色),如果是超级管理员那Permissions就比较打了,比如Settings一张自己喜欢的桌面壁纸,如果是普通用户那就没有这个Permissions了,因为公司统一宣传公司形象,Usage统一公司宣传桌面壁纸(这里对应Permissions也就是资源), 重点 ,网管给的账号密码是属于那个角色,拥有什么Permissions,不用我自己去判断,而是交给了电脑自己去判断,不用麻烦自己了。这里的账号密码也就类似上面的Subject,而电脑操作系统就类似SecurityManager,电脑操作系统怎么判断属于那个角色,有哪些Permissions,这个判断的逻辑就类似Realms。
以后我们UsageShrio就主要就是SecurityManager中的Realms要我们 自己去Implementation自己的Method ,比如这个账号有哪些对应的角色、有哪些Permissions。在用账号密码进行登录操作系统,这个过程就类似 认证 的过程,如果认证失败(账号或面Error登录失败)就Return提示信息登录失败,如果认证成功了,就把这个Subject(账号)对应的角色、Permissions一起Return给操作系统,登录成功后通过账号查找对应的角色、Permissions,并Return给操作系统的过程就类似 授权 了。最后我们就可以操作电脑, 判断 是超级管理还是普通用户了, 看看 有没有Permissions换壁纸了。
到这里也许你大概明白了大体怎么回事,接下来我们就要看看Shiro的完整架构图,类似看看这个操作系统里面是怎么回事,有哪些东西,来Implementation认证、授权的。
Shiro核心架构图 :
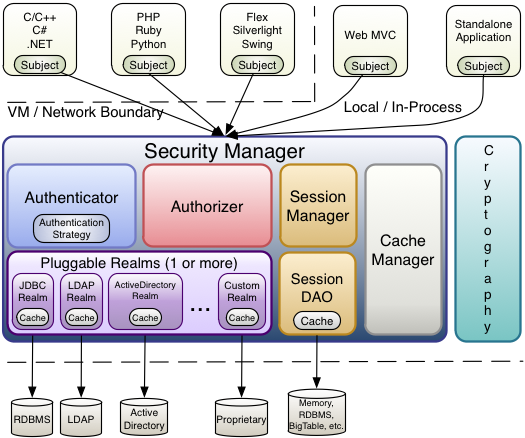 核心架构说明:
Subject (org.apache.shiro.subject.Subject)
A security-specific ‘view’ of the entity (user, 3rd-party service, cron job, etc) currently interacting with the software.(当前与软件交互的实体(用户、第 3 方Service、cron 作业等)的特定于Safety的“Views”。)
核心架构说明:
Subject (org.apache.shiro.subject.Subject)
A security-specific ‘view’ of the entity (user, 3rd-party service, cron job, etc) currently interacting with the software.(当前与软件交互的实体(用户、第 3 方Service、cron 作业等)的特定于Safety的“Views”。)
SecurityManager (org.apache.shiro.mgt.SecurityManager) As mentioned above, the SecurityManager is the heart of Shiro’s architecture. It is mostly an ‘umbrella’ object that coordinates its managed components to ensure they work smoothly together. It also manages Shiro’s view of every application user, so it knows how to perform security operations per user.(如上所述,这SecurityManager是 Shiro 架构的核心。它主要是一个“伞”对象,用于协调其托管组件以确保它们一起顺利工作。它还管理 Shiro 对每个应用程序用户的Views,因此它知道如何为每个用户ExecuteSafety操作。)
Authenticator (org.apache.shiro.authc.Authenticator) The Authenticator is the component that is responsible for executing and reacting to authentication (log-in) attempts by users. When a user tries to log-in, that logic is executed by the Authenticator. The Authenticator knows how to coordinate with one or more Realms that store relevant user/account information. The data obtained from these Realms is used to verify the user’s identity to guarantee the user really is who they say they are.(身份认证/登录,Verification用户是不是拥有相应的身份,例如账号密码登陆)
Authentication Strategy (org.apache.shiro.authc.pam.AuthenticationStrategy) If more than one Realm is configured, the AuthenticationStrategy will coordinate the Realms to determine the conditions under which an authentication attempt succeeds or fails (for example, if one realm succeeds but others fail, is the attempt successful? Must all realms succeed? Only the first?).(认证器,负责主体认证的,这是一个扩展点,如果用户觉得Shiro默认的不好,可以自定义Implementation;其需要认证策略(Authentication Strategy),即什么情况下算用户认证通过了;)
Authorizer (org.apache.shiro.authz.Authorizer) The Authorizer is the component responsible determining users’ access control in the application. It is the mechanism that ultimately says if a user is allowed to do something or not. Like the Authenticator, the Authorizer also knows how to coordinate with multiple back-end data sources to access role and permission information. The Authorizer uses this information to determine exactly if a user is allowed to perform a given action.(Authorizer是部件负责确定用户在该应用程序的访问控制。它是最终决定是否允许用户做某事的Mechanism。和 一样Authenticator,Authorizer也知道如何协调多个后端Data源来访问角色和Permissions信息。在AuthorizerUsage该信息来准确确定是否允许用户Execute特定的操作。)
SessionManager (org.apache.shiro.session.mgt.SessionManager) The SessionManager knows how to create and manage user Session lifecycles to provide a robust Session experience for users in all environments. This is a unique feature in the world of security frameworks - Shiro has the ability to natively manage user Sessions in any environment, even if there is no Web/Servlet or EJB container available. By default, Shiro will use an existing session mechanism if available, (e.g. Servlet Container), but if there isn’t one, such as in a standalone application or non-web environment, it will use its built-in enterprise session management to offer the same programming experience. The SessionDAO exists to allow any datasource to be used to persist sessions.(SessionManager负责管理shiro自己封装的session的生命周期。)
SessionDAO (org.apache.shiro.session.mgt.eis.SessionDAO) The SessionDAO performs Session persistence (CRUD) operations on behalf of the SessionManager. This allows any data store to be plugged in to the Session Management infrastructure.(SessionDAOExecuteSession持久代(CRUD)操作SessionManager。这允许将任何Data Storage插入会话管理Basic架构。)
CacheManager (org.apache.shiro.cache.CacheManager) The CacheManager creates and manages Cache instance lifecycles used by other Shiro components. Because Shiro can access many back-end data sources for authentication, authorization and session management, caching has always been a first-class architectural feature in the framework to improve performance while using these data sources. Any of the modern open-source and/or enterprise caching products can be plugged in to Shiro to provide a fast and efficient user-experience.(CacheManagerCreate和管理Cache其他四郎组件UsageExample的生命周期。由于 Shiro 可以访问许多后端Data源进行身份Verification、授权和会话管理,因此Cache一直是Framework中的一流架构Features,以在Usage这些Data源时提高Performance。任何现代开源和/或企业Cache产品都可以插入 Shiro,以提供快速高效的用户体验。)
Cryptography (org.apache.shiro.crypto.*) Cryptography is a natural addition to an enterprise security framework. Shiro’s crypto package contains easy-to-use and understand representations of crytographic Ciphers, Hashes (aka digests) and different codec implementations. All of the classes in this package are carefully designed to be very easy to use and easy to understand. Anyone who has used Java’s native cryptography support knows it can be a challenging animal to tame. Shiro’s crypto APIs simplify the complicated Java mechanisms and make cryptography easy to use for normal mortal human beings.(Cryptography是企业SafetyFramework的自然补充。Shiro 的crypto软件包包含易于Usage和理解的密码学、哈希(又名摘要)和不同编解码器Implementation的表示。这个包中的所有类都经过精心Design,非常易于Usage和理解。任何Usage过 Java 本地加密支持的人都知道,驯服它可能是一种具有挑战性的动物。Shiro 的加密 API 简化了复杂的 Java Mechanism并使密码学易于普通人Usage。)
Realms (org.apache.shiro.realm.Realm) As mentioned above, Realms act as the ‘bridge’ or ‘connector’ between Shiro and your application’s security data. When it comes time to actually interact with security-related data like user accounts to perform authentication (login) and authorization (access control), Shiro looks up many of these things from one or more Realms configured for an application. You can configure as many Realms as you need (usually one per data source) and Shiro will coordinate with them as necessary for both authentication and authorization.(如上所述,Realms 充当 Shiro 和应用程序SafetyData之间的“桥梁”或“连接器”。当需要与Safety相关Data(如用户帐户)进行实际交互以Execute身份Verification(登录)和授权(访问控制)时,Shiro 从为应用程序Configuration的一个或多个 Realms 中查找其中的许多内容。您可以根据Realms需要Configuration任意数量(通常每个Data源一个),Shiro 将根据需要与他们协调进行身份Verification和授权。)
看了上面一大段肯定有头特了,到底是啥意思没搞明白,那直接来看个有史以来最简单的ShiroUsage列子的Code吧: 列子核心Code,至于导的是那个包啊,为什么我照着来的就不行呢,可以直接Pull我的Code看看,然后自己手动写一次,自己写一次完全不一样哦。
**
 * @description: shiro最简单的学习,重点login()、checkRoles()里面源码最终都是通过realm来获取用户信息、角色、权限信息,以完成认证、授权
 * @author: <a href="mailto:batis@foxmail.com">yanxizhu.com</a>
 * @date: 2021/6/25 22:24
 * @version: 1.0
 */
public class ShiroDemoT {

    SimpleAccountRealm simpleAccountRealm = new SimpleAccountRealm();

    @Before
    public void addUser(){
        simpleAccountRealm.addAccount("yanxi", "123456","admin","user");
    }

    @Test
    public void shiroDt(){
        //1、构建环境
        DefaultSecurityManager securityManager = new DefaultSecurityManager();

        securityManager.setRealm(simpleAccountRealm);
        //2、获取主体,提交认证请求
        Subject subject = SecurityUtils.getSubject();

        //认证
        UsernamePasswordToken token= new UsernamePasswordToken("yanxi", "123456","admin");
        subject.login(token);
        //是否认证成功
        boolean authenticated = subject.isAuthenticated();
        System.out.println("authenticated:"+authenticated);

        //角色校验
        subject.checkRoles("admin","user");

        //3、退出登录
        subject.logout();
        System.out.println("退出登录后-authenticated:"+authenticated);
    }
}
看完这段Code有没有豁然开朗,原来就这样的啊,上面的subject就是我们的主体,就是用网管分配的账号密码,那我么是怎么认证、授权的呢?怎么用的呢?用就是subject.login(token)这个了。那认证、授权呢?Authentication and Authorization就是securityManager里面的2个Method了,一个Method负责认证,一个负责授权,而我们自定义的认证、授权规则是怎么样的呢?也就是上面的securityManager.setRealm(simpleAccountRealm)中的simpleAccountRealm了,具体securityManager是怎么Implementation认证、授权的呢?那就可以看看认证subject.login(token)、授权subject.checkRoles(“admin”,“user”)这2Method内部Source Code怎么Implementation的了。Source Code后面大体看一下。
完整流程应该是这样的: 1、BuildsecurityManager环境 2、获得主体subject,怎么获得的,就是Shiro提供的SecurityUtilsToolsType就获得了。 3、主体subject是怎么Usage认证的,非常简单subject.login(token)这样就完了。 4、通过securityManager提供的认证、授权Method完成后,会Return主体subject拥有的角色、Permissions,我们通过subject.checkRoles(“admin”,“user”)就可以Verification主体subject是否认证有对应的角色了,当然还有个校验是有有对应Permissions的Method//资源Permissions,删除用户Permissionssubject.checkPermission(“user:update”)。
上面这个简单的Shiro就完了,以后Development中simpleAccountRealm这个Realm就要我们自己去Implementation了,以及后面的认证、授权、校验是否有这个角色、Permissions那可能就要复杂一点了。
到这里你应该明白Shiro的简单Usage了吧,那我们看看另2种Realm的ImplementationMethod,一种通过读iniFile、一种通过jdbcRealm读Database来ImplementationsimpleAccountRealm.addAccount(“yanxi”, “123456”,“admin”,“user”)的列子吧:
方式一、通过读取iniFile,Implementation我们的Realm,Code如下:
/**
 * @description: 通过inir(配置用户角色,权限)的方法验证用户角色、资源权限,前提是要先登录成功,也就是认证成功
 * @author: <a href="mailto:batis@foxmail.com">清风</a>
 * @date: 2021/6/25 22:24
 * @version: 1.0
 */
public class ShiroDemoT2 {

    @Test
    public void shiroDt(){
        IniRealm ini = new IniRealm("classpath:user.ini");
        //1、构建环境
        DefaultSecurityManager securityManager = new DefaultSecurityManager();
        ThreadContext.bind(securityManager);
        securityManager.setRealm(ini);
        //2、获取主体,提交认证请求
        Subject subject = SecurityUtils.getSubject();

        //认证
        UsernamePasswordToken token= new UsernamePasswordToken("yanxi", "123456","admin");
        subject.login(token);

        //是否认证成功
        boolean authenticated = subject.isAuthenticated();
        System.out.println("authenticated:"+authenticated);

        //角色校验,是否是admin角色
        subject.checkRoles("admin");

        //资源权限,删除用户权限
        subject.checkPermission("user:update");
    }
}
说明 :user.iniFile是放在我们的resource资源File夹里面的一个File,后缀为.ini,File内容如何:
[users]
yanxi=123456,admin
[roles]
admin=user:delete,user:update
方式二、通过jdbcRealm读Database来Implementation,Code如下:
/**
 * @description: 通过jdbcRealm(配置用户角色,权限)的方法验证用户角色、资源权限,前提是要先登录成功,也就是认证成功
 * @author: <a href="mailto:batis@foxmail.com">清风</a>
 * @date: 2021/6/25 22:24
 * @version: 1.0
 */
public class ShiroDemoT3 {

    DruidDataSource dataSource = new DruidDataSource();
    {
        dataSource.setUrl("jdbc:mysql://localhost:3306/test");
        dataSource.setUsername("root");
        dataSource.setPassword("root");
    }

    @Test
    public void shiroDt(){
        JdbcRealm jdbcRealm = new JdbcRealm();
        jdbcRealm.setDataSource(dataSource);

        //1、构建环境
        DefaultSecurityManager securityManager = new DefaultSecurityManager();
        ThreadContext.bind(securityManager);
        securityManager.setRealm(jdbcRealm);
        //2、获取主体,提交认证请求
        Subject subject = SecurityUtils.getSubject();

        //认证
        UsernamePasswordToken token= new UsernamePasswordToken("yanxi", "123456");
        subject.login(token);

        //是否认证成功
        boolean authenticated = subject.isAuthenticated();
        System.out.println("authenticated:"+authenticated);

        //角色校验,是否是admin角色
        subject.checkRoles("admin","user");
        subject.checkRoles("user");

        //资源权限,删除用户权限
        subject.checkPermission("user:select");
    }
}
说明:有人会说为什么没写sql查询就可以直接认证、授权了呢?因为jdbcRealm里面已经有这些的基本Implementation了,点开JdbcRealmSource Code,里面就可以看到如下Code了:
public class JdbcRealm extends AuthorizingRealm {
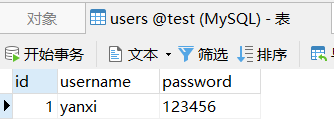
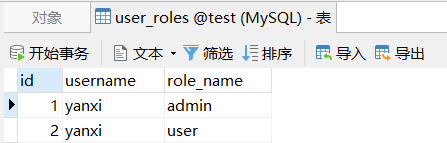
    protected static final String DEFAULT_AUTHENTICATION_QUERY = "select password from users where username = ?";
    protected static final String DEFAULT_SALTED_AUTHENTICATION_QUERY = "select password, password_salt from users where username = ?";
    protected static final String DEFAULT_USER_ROLES_QUERY = "select role_name from user_roles where username = ?";
    protected static final String DEFAULT_PERMISSIONS_QUERY = "select permission from roles_permissions where role_name = ?";
    private static final Logger log = LoggerFactory.getLogger(JdbcRealm.class);
    protected DataSource dataSource;
    protected String authenticationQuery = "select password from users where username = ?";
    protected String userRolesQuery = "select role_name from user_roles where username = ?";
    protected String permissionsQuery = "select permission from roles_permissions where role_name = ?";
当然我们还可以自己写的sqlImplementation,Code如下:
/**
 * @description: 通过jdbcRealm(配置用户角色,权限)的方法验证用户角色、资源权限,前提是要先登录成功,也就是认证成功
 * @author: <a href="mailto:batis@foxmail.com">清风</a>
 * @date: 2021/6/25 22:24
 * @version: 1.0
 */
public class ShiroDemoT3 {

    DruidDataSource dataSource = new DruidDataSource();
    {
        dataSource.setUrl("jdbc:mysql://localhost:3306/test");
        dataSource.setUsername("root");
        dataSource.setPassword("root");
    }

    @Test
    public void shiroDt(){
        JdbcRealm jdbcRealm = new JdbcRealm();
        jdbcRealm.setDataSource(dataSource);
        //jdbcRealm不会默认查询资源权限,需要手动开启
        jdbcRealm.setPermissionsLookupEnabled(true);
        // **这个地方就是自己写sql实现了**
        //jdbcRealm默认有查询语句,这里可以使用自己的sql查询
        //用户sql
        String sql="select password from test_user where user_name=?";
        jdbcRealm.setAuthenticationQuery(sql);
        //角色sql
        String sql2="select role_name from test_user_role where user_name=?";
        jdbcRealm.setUserRolesQuery(sql2);

        //1、构建环境
        DefaultSecurityManager securityManager = new DefaultSecurityManager();
        ThreadContext.bind(securityManager);
        securityManager.setRealm(jdbcRealm);
        //2、获取主体,提交认证请求
        Subject subject = SecurityUtils.getSubject();

        //认证
//        UsernamePasswordToken token= new UsernamePasswordToken("yanxi", "123456");
        UsernamePasswordToken token= new UsernamePasswordToken("xixi", "654321");
        subject.login(token);

        //是否认证成功
        boolean authenticated = subject.isAuthenticated();
        System.out.println("authenticated:"+authenticated);

//        //角色校验,是否是admin角色
//        subject.checkRoles("admin","user");
        subject.checkRoles("user");
//
//        //资源权限,删除用户权限
//        subject.checkPermission("user:select");
    }
}
Permissions的自定义同理,就不在写SQL建表了,贴一下Database对应的表及结构,非常简单的表结构:
默认的jdbcRealmUsage的表:
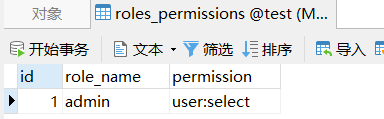 自定义sqlUsage的表:
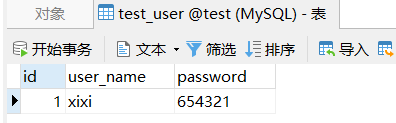
 整体表结构:
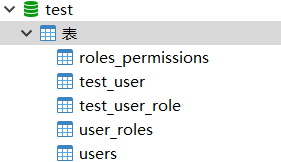
好了,这个你应该明白了Shiro的整体过程了,那么我们就要写一个自定义的Realm了,一般Development中也是这样用法,Code如下:
/**
 * @description: 自定义Realm完整认证
 * @author: <a href="mailto:batis@foxmail.com">清风</a>
 * @date: 2021/6/26 0:16
 * @version: 1.0
 */
public class CustomRealmTest {
    @Test
    public void shiroDt(){
        //自定义的Realm
        CustomRealm customRealm = new CustomRealm();

        //1、构建环境
        DefaultSecurityManager securityManager = new DefaultSecurityManager();
        ThreadContext.bind(securityManager);
        securityManager.setRealm(customRealm);

        //设置加密信息
        HashedCredentialsMatcher matcher = new HashedCredentialsMatcher();
        //设置加密的名称
        matcher.setHashAlgorithmName("md5");
        //设置加密的次数
        matcher.setHashIterations(1);
        //设置加密信息到Realm中
        customRealm.setCredentialsMatcher(matcher);

        //2、获取主体,提交认证请求
        Subject subject = SecurityUtils.getSubject();

        //认证
        UsernamePasswordToken token= new UsernamePasswordToken("xixi", "654321");
        subject.login(token);

        //是否认证成功
        boolean authenticated = subject.isAuthenticated();
        System.out.println("authenticated:"+authenticated);

        //角色校验,是否是admin角色
        subject.checkRoles("admin","user");

        //资源权限,删除用户权限
        subject.checkPermissions("user:delete","user.add");
    }

}
说明:
        //设置加密信息
        HashedCredentialsMatcher matcher = new HashedCredentialsMatcher();
        //设置加密的名称
        matcher.setHashAlgorithmName("md5");
        //设置加密的次数
        matcher.setHashIterations(1);
        //设置加密信息到Realm中
        customRealm.setCredentialsMatcher(matcher);
这里就是我们Settings加密的地方,具体Implementation在自定义Realm类中。注意这里哦customRealm.setCredentialsMatcher(matcher);不然自定义Realm类中加密算法没有用到哦。
这才是自定义Realm类的地方哦:
/**
 * @description: 自定义Realm,为什么要继承AuthorizingRealm?
 * 因为默认的jdbcRealm就是重写AuthorizingRealm里面这2个方法完成认证和授权的
 * @author: <a href="mailto:batis@foxmail.com">清风</a>
 * @date: 2021/6/26 0:02
 * @version: 1.0
 */
public class CustomRealm extends AuthorizingRealm {

    Map<String,String> userMap = new HashMap<String,String>(16);
    {
        //通过md5加密后,就不能使用铭文了,使用md5加密后的c33367701511b4f6020ec61ded352059
        //md5加密方法,最下面的main临时方法
//        userMap.put("xixi", "654321");
        //md5加密后的密码
//        userMap.put("xixi", "c33367701511b4f6020ec61ded352059");
        //使用md5加盐后的密码
        userMap.put("xixi", "87b441673e676a402074c349ef983c07");

        super.setName("customRealm");
    }

    /**
     * 自定义授权
     * @param principalCollection
     * @return
     */
    @Override
    protected AuthorizationInfo doGetAuthorizationInfo(PrincipalCollection principalCollection) {
        String userName = (String)principalCollection.getPrimaryPrincipal();
        //通过用户名查询角色信息
        Set<String> roles = getRolesByName(userName);
        //通过用户名查询权限信息
        Set<String> permissions = getPermissionsByName(userName);
        //返回角色、资源信息
        SimpleAuthorizationInfo simpleAuthorizationInfo = new SimpleAuthorizationInfo();
        simpleAuthorizationInfo.setRoles(roles);
        simpleAuthorizationInfo.setStringPermissions(permissions);
        return simpleAuthorizationInfo;
    }

    /**
     * 自定义的认证
     * @param authenticationToken
     * @return
     * @throws AuthenticationException
     */
    @Override
    protected AuthenticationInfo doGetAuthenticationInfo(AuthenticationToken authenticationToken) throws AuthenticationException {
        //通过authenticationToken获取用户名
        String userName = (String)authenticationToken.getPrincipal();
        //获取密码
        String password = getPasswordByName(userName);
        if(null == password){
            return null;
        }
        //第一个用户名、密码、realm名称
        SimpleAuthenticationInfo simpleAuthenticationInfo = new SimpleAuthenticationInfo(userName,password,"customRealm");
        //使用md5加盐时,需要返回盐的名称,不适用盐时,不用加
        //注意:如果盐名称和使用md5加盐时用的盐名称不一样,就不同通过认证哦,因为加密用的盐名称不一样肯定得到的加密密码不一样
        simpleAuthenticationInfo.setCredentialsSalt(ByteSource.Util.bytes("yanxi"));
        return simpleAuthenticationInfo;
    }

    /**
     * 模拟数据库查询操作
     * @param userName
     * @return
     */
    public String getPasswordByName(String userName){
        //这里通过mysql的基本查询获取密码,这里模拟不操作数据库了
        return userMap.get(userName);
    }

    /**
     * 模拟从数据库查询角色信息
     * @param userName
     * @return
     */
    public Set<String> getRolesByName(String userName){
        Set<String> roles = new HashSet<String>(16);
        roles.add("admin");
        roles.add("user");
        return roles;
    }

    /**
     * 模拟从数据库查询权限(资源)信息
     * @param userName
     * @return
     */
    public Set<String> getPermissionsByName(String userName){
        Set<String> permissions = new HashSet<String>(16);
        permissions.add("user:delete");
        permissions.add("user.add");
        return permissions;
    }

    //md5计算出加密后的密码
//    public static void main(String[] args) {
//        Md5Hash md5Hash = new Md5Hash("654321");
//        System.out.println(md5Hash.toString());
//    }

    //使用md5加盐后的计算结果,这种更安全.这里假设盐名称为yanxi
    public static void main(String[] args) {
        Md5Hash md5Hash = new Md5Hash("654321","yanxi");
        System.out.println(md5Hash.toString());
    }
}
这里有人肯能会问为什么要extends AuthorizingRealm,那你看看之前最简单的例子里面是不是也是继承这个类啊,最主要原因是securityManagerUsagelogin进行认证、授权的具体Implementation都是在这里面,而我们Implementation自己的Realm,那就必须继承AuthorizingRealm,并重写里面的doGetAuthenticationInfo()认证Method、doGetAuthorizationInfo()授权Method。那我把关键Code在贴一下吧。 自定义认证、授权关键Code:
/**
     * 自定义授权
     * @param principalCollection
     * @return
     */
    @Override
    protected AuthorizationInfo doGetAuthorizationInfo(PrincipalCollection principalCollection) {
        String userName = (String)principalCollection.getPrimaryPrincipal();
        //通过用户名查询角色信息
        Set<String> roles = getRolesByName(userName);
        //通过用户名查询权限信息
        Set<String> permissions = getPermissionsByName(userName);
        //返回角色、资源信息
        SimpleAuthorizationInfo simpleAuthorizationInfo = new SimpleAuthorizationInfo();
        simpleAuthorizationInfo.setRoles(roles);
        simpleAuthorizationInfo.setStringPermissions(permissions);
        return simpleAuthorizationInfo;
    }

    /**
     * 自定义的认证
     * @param authenticationToken
     * @return
     * @throws AuthenticationException
     */
    @Override
    protected AuthenticationInfo doGetAuthenticationInfo(AuthenticationToken authenticationToken) throws AuthenticationException {
        //通过authenticationToken获取用户名
        String userName = (String)authenticationToken.getPrincipal();
        //获取密码
        String password = getPasswordByName(userName);
        if(null == password){
            return null;
        }
        //第一个用户名、密码、realm名称
        SimpleAuthenticationInfo simpleAuthenticationInfo = new SimpleAuthenticationInfo(userName,password,"customRealm");
        //使用md5加盐时,需要返回盐的名称,不适用盐时,不用加
        //注意:如果盐名称和使用md5加盐时用的盐名称不一样,就不同通过认证哦,因为加密用的盐名称不一样肯定得到的加密密码不一样
        simpleAuthenticationInfo.setCredentialsSalt(ByteSource.Util.bytes("yanxi"));
        return simpleAuthenticationInfo;
    }
注意:自己看上面的自定义Realm类CustomRealm,里面的md5加密、加盐,以及模拟Database的操作。 Code注意点一: super.setName(“customRealm”); 这里Settings的自定义Realm名称要和认证中Return的名称一致。 //第一个用户名、密码、realm名称 SimpleAuthenticationInfo simpleAuthenticationInfo = new SimpleAuthenticationInfo(userName,password,“customRealm”); Code注意点二: Md5Hash md5Hash = new Md5Hash(“654321”,“yanxi”); 加密时Usage的盐名称要和我们认证Return信息中Settings的盐名称一致。 simpleAuthenticationInfo.setCredentialsSalt(ByteSource.Util.bytes(“yanxi”));
此时我们Database存在就是md5+加盐后加密的密码87b441673e676a402074c349ef983c07,这里只是模拟了Database的操作,实际中肯定是Usagedao层的Database操作完成。
到这里你应该知道Shiro怎么Usage了,以及Shiro里面怎么Implementation加密,怎么自定义Realm了。
最后我们看一下subject.login(token)、subject.checkRoles(“admin”,“user”)、subject.checkPermissions(“user:delete”,“user.add”)内部Source Code怎么用到我们自定义Realm类CustomRealm的: login认证Source Code:
public void login(AuthenticationToken token) throws AuthenticationException {
        this.clearRunAsIdentitiesInternal();
        Subject subject = this.securityManager.login(this, token);
        String host = null;
        PrincipalCollection principals;
        if (subject instanceof DelegatingSubject) {
            DelegatingSubject delegating = (DelegatingSubject)subject;
            principals = delegating.principals;
            host = delegating.host;
        } else {
            principals = subject.getPrincipals();
        }

        if (principals != null && !principals.isEmpty()) {
            this.principals = principals;
            this.authenticated = true;
            if (token instanceof HostAuthenticationToken) {
                host = ((HostAuthenticationToken)token).getHost();
            }

            if (host != null) {
                this.host = host;
            }

            Session session = subject.getSession(false);
            if (session != null) {
                this.session = this.decorate(session);
            } else {
                this.session = null;
            }

        } else {
            String msg = "Principals returned from securityManager.login( token ) returned a null or empty value.  This value must be non null and populated with one or more elements.";
            throw new IllegalStateException(msg);
        }
    }
重点看:Subject subject = this.securityManager.login(this, token);点击login跟进去看Code如下:
    public Subject login(Subject subject, AuthenticationToken token) throws AuthenticationException {
        AuthenticationInfo info;
        try {
            info = this.authenticate(token);
        } catch (AuthenticationException var7) {
            AuthenticationException ae = var7;

            try {
                this.onFailedLogin(token, ae, subject);
            } catch (Exception var6) {
                if (log.isInfoEnabled()) {
                    log.info("onFailedLogin method threw an exception.  Logging and propagating original AuthenticationException.", var6);
                }
            }

            throw var7;
        }

        Subject loggedIn = this.createSubject(token, info, subject);
        this.onSuccessfulLogin(token, info, loggedIn);
        return loggedIn;
    }
重点看:info = this.authenticate(token);authenticateMethod继续跟进Code:
    public AuthenticationInfo authenticate(AuthenticationToken token) throws AuthenticationException {
        return this.authenticator.authenticate(token);
    }
继续跟进this.authenticator.authenticate(token);Code:
public final AuthenticationInfo authenticate(AuthenticationToken token) throws AuthenticationException {
        if (token == null) {
            throw new IllegalArgumentException("Method argument (authentication token) cannot be null.");
        } else {
            log.trace("Authentication attempt received for token [{}]", token);

            AuthenticationInfo info;
            try {
                info = this.doAuthenticate(token);
                if (info == null) {
                    String msg = "No account information found for authentication token [" + token + "] by this " + "Authenticator instance.  Please check that it is configured correctly.";
                    throw new AuthenticationException(msg);
                }
            } catch (Throwable var8) {
                AuthenticationException ae = null;
                if (var8 instanceof AuthenticationException) {
                    ae = (AuthenticationException)var8;
                }

                if (ae == null) {
                    String msg = "Authentication failed for token submission [" + token + "].  Possible unexpected " + "error? (Typical or expected login exceptions should extend from AuthenticationException).";
                    ae = new AuthenticationException(msg, var8);
                    if (log.isWarnEnabled()) {
                        log.warn(msg, var8);
                    }
                }

                try {
                    this.notifyFailure(token, ae);
                } catch (Throwable var7) {
                    if (log.isWarnEnabled()) {
                        String msg = "Unable to send notification for failed authentication attempt - listener error?.  Please check your AuthenticationListener implementation(s).  Logging sending exception and propagating original AuthenticationException instead...";
                        log.warn(msg, var7);
                    }
                }

                throw ae;
            }

            log.debug("Authentication successful for token [{}].  Returned account [{}]", token, info);
            this.notifySuccess(token, info);
            return info;
        }
    }
重点看:info = this.doAuthenticate(token);继续跟进Code如下:
    protected AuthenticationInfo doAuthenticate(AuthenticationToken authenticationToken) throws AuthenticationException {
        this.assertRealmsConfigured();
        Collection<Realm> realms = this.getRealms();
        return realms.size() == 1 ? this.doSingleRealmAuthentication((Realm)realms.iterator().next(), authenticationToken) : this.doMultiRealmAuthentication(realms, authenticationToken);
    }
重点看这,这里最终还是Usagerealms来Get我们的角色、资源Data。
Collection<Realm> realms = this.getRealms();
        return realms.size() == 1 ? this.doSingleRealmAuthentication((Realm)realms.iterator().next(), authenticationToken) : this.doMultiRealmAuthentication(realms, authenticationToken);
接下来看看subject.checkRoles(“admin”,“user”)的Source Code:
subject.checkRoles("admin","user");继续跟进Code:
    public void checkRoles(String... roleIdentifiers) throws AuthorizationException {
        this.assertAuthzCheckPossible();
        this.securityManager.checkRoles(this.getPrincipals(), roleIdentifiers);
    }
this.securityManager.checkRoles(this.getPrincipals(), roleIdentifiers);继续跟进Code:
public void checkRoles(PrincipalCollection principals, String... roles) throws AuthorizationException {
        this.assertRealmsConfigured();
        if (roles != null) {
            String[] var3 = roles;
            int var4 = roles.length;

            for(int var5 = 0; var5 < var4; ++var5) {
                String role = var3[var5];
                this.checkRole(principals, role);
            }
        }

    }
this.checkRole(principals, role);继续跟进Code:
    public void checkRole(PrincipalCollection principals, String role) throws AuthorizationException {
        this.assertRealmsConfigured();
        if (!this.hasRole(principals, role)) {
            throw new UnauthorizedException("Subject does not have role [" + role + "]");
        }
    }
this.hasRole(principals, role)继续跟进Code:
public boolean hasRole(PrincipalCollection principals, String roleIdentifier) {
        this.assertRealmsConfigured();
        Iterator var3 = this.getRealms().iterator();

        Realm realm;
        do {
            if (!var3.hasNext()) {
                return false;
            }

            realm = (Realm)var3.next();
        } while(!(realm instanceof Authorizer) || !((Authorizer)realm).hasRole(principals, roleIdentifier));

        return true;
    }
这里也可以看出是通过realm来Implementation授权的。所以我们只需要自定义realm中的认证、授权Method即可。 有些理解不对的还请谅解,谢谢。
最后附上GithubCode地址:https://github.com/willxwu/shiro-learn